
This was another quick and dirty, do-it-in-a-day project and I'm actually super thrilled about the results!
So let's talk about the idea of recycled clothing. It's definitely not a new idea even though Millennials or Gen Zs (or Ys or Xs or whatever the latest generation is being called) may like to believe THEY came up with it because only THEY want to save the world from ultimate destruction of human kind and evil capitalism . . . Ooops, sorry I digress.
Anyway, reusing and repurposing clothing has been around, well as long as clothing has been around I suspect. And not just mending holes. I'm talking whole-sale reconstructing one garment into something else. I LOVE to do it because it's so fascinating to see how one item of clothing (especially when it has been really loved) can turn into something entirely different with a whole new spirit!
So here we go with a favorite button-down shirt of mine (by Levi's) that I likely bought from Target probably a decade ago. I have love, love, loved it, but I find myself never wearing it anymore. I had it in a pile to give to Goodwill, but I kept taking it out of the pile because, well something was telling me to.
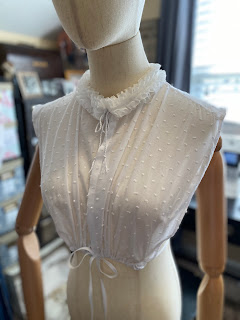
And last week as I passed by it again I thought . . . YES! CHEMISETTE! And that day the shirt and I conspired to create a beautiful, Regency white, cotton, dotted swiss chemisette. And it was perfect.
HOW IT STARTED: Okay here's the shirt in it's original form. Washed but not ironed. In perfectly good shape, no tears or stains. I think I stopped wearing it because it just got a bit big on me.


THE PATTERN: I used one of the many scaled diagrams in Janet Arnold's Patterns of History (but honestly chemisettes are pretty easy you can probably make one of these up on your own at home).
 |
| I used the top left gathered diagram for it's simplicity. |
 |
| Because I was limited to the original shirt I did NOT do the back on the bias. |


 |
| Plain neckline option. |
 |
| Ruffled neckline option. |


What is YOUR favorite Make-do-and-Mend project? Please share in the comments.
No comments:
Post a Comment